Showing posts with label DIY. Show all posts

Friday, November 29, 2019

Couch storage

With a new couch came the wish (need?) for more storage. In our previous couch I always had a «project» or two taking up a seat. To DaddyO slight frustration, it always looked abit messy. When a few springs gave in, we opted for a new couch. After looking around and trying a few couches, we landed on the Vallentuna series by IKEA. This is a modular couch that you can put together as you please. We went for the storage in every seat version. Now my projects can be put away when I’m not working on them. You can use IKEAs planner to try out the different setups to find your favorite and get a shopping list of all the parts you will need. Our setup has the code 4FQNNJ in IKEAs planner wizard (which you can find here). The girls still make a mess when sitting on the couch, so we went for the faux leather cover for easier cleaning.
assembled, but not finished cleaning up

I happen to come over a few pins on Pintrest on couch storage and fell in love with the option to have charger cables tucked away in a shelf behind the couch. I did some more digging and started planning my own version. My shelf ended up being a little more complex that the version I started with. A hinged shelf with storage beneath. So I would have less clutter on the living room table. Win, win!
hinged

I bought wood planks the width I wanted for the shelf and some square planks to fasten the shelf on. When I was happy with my setup, all visible surfaces got three coats of wood stain from IKEA. Within the shelf I place a power cord for the mobile phone chargers. No more cables stretched across the couch.
blending in
-how do you keep clutter away from the couch area?

Thursday, May 11, 2017

No way back now…

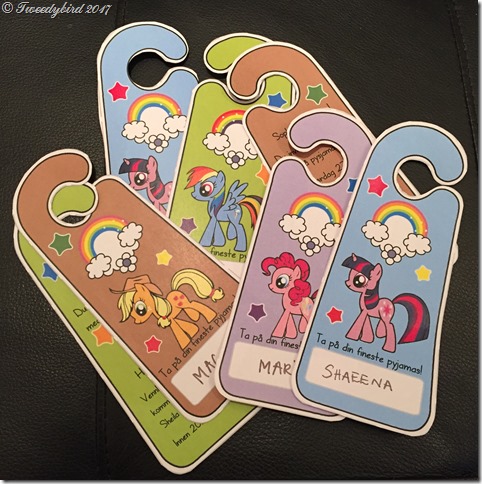
Yesterday the invites went out to SweetieS birthday celebration with her kindergarten friends. Am I the only one a little nervous when sending out 17(!) invites? I have been researching and doodling around what theme. After checking with SweetieS we landed on My Little Pony theme.

I had fun making last years invites. (the post about last year “happening” is here) So again, thanx to Pintrest I got hold of a template I wanted to use for the invites. The original door hanger is available here. I did some editing on the originals to make it more “invite friendly”. The backside is mirrored and with party details.

Bilde 11.05.2017, 20.22.41

Last year we had the kids over for 2 hours. Those are two intens hours….but worth it. SweetieS was very pleased with everything. The difference this time is that we are also inviting “the boys”. Hopefully it won’t get too out of hand….

Still two weeks until the event…so until then no more pictures. I know some of you mums attending read my blog, so no spoilers.

- how do you plan your kids birthday parties?
- do you have any smart tips to share?

Thursday, January 19, 2017

A “quick” DYI

This DYI project was quick to assemble but not so fast when it comes to the accquering of the supplies.
With kids in house we buy raisins on a regular basis. One day when I had an empty box at hand I though these might work…for a bottle rack for all the drinking bottles the girls have.
So we went from this…

Bilde 16.01.2017, 16.52.00a small chaos of drinking bottles
to this…
Bilde 16.01.2017, 16.51.15
using these…
Bilde 16.01.2017, 16.53.14
They are simply glued together using a hot glue gun. Still need a few more raisin boxes. Happy with this solution.
-have you done any DYI projects lately?

Friday, November 4, 2016

Foiled dividers

Heard of the minc machine by Heidi Swapp? If you’ve heard of it you know what this post about. If not…take a look at this video


the wonderful Jennifer Mcguire recaps foiling in a great way

Since I have a laminator, I had to give it a try. But getting a hold of foil paper was more expensive than I thought. There are so many beautiful colors to choose from…what color to choose? Well actually I wound up with another option. Instead of using the recommended foil paper, I used foil meant for nail design, since I had it laying around from an earlier nail project. And the results…really nice

Bilde 04.11.2016, 21.49.19 Bilde 04.11.2016, 21.49.28 Bilde 04.11.2016, 21.46.53

This only works with toner printed so I printed a few transparencies with beautiful black and white patterns I found online. As I wanted to make new dividers for my planner, I cut them into size before foiling them.

With the hearts divider, I choose to make one heart in another color….so I added a silver heart…

Bilde 04.11.2016, 21.47.08

Still waiting for a copper and turquoise colored foil for the last dividers. So still missing the last of my new dividers for my planner setup for 2017… Oh and I used these nail foils…bought of ebay of course…

- have you tried foiling with a laminator?
- what are your 2017 planner plans?

Now what to foil next?

Friday, September 30, 2016

Some here and there

After being sick the past week I haven’t had time to write a post on the things I finished before I fell ill.

Been playing around with a new monthly layout in my planner… I’m just not happy with all the work I have to put in every month and the general layout. I posted about my previous monthly layout here. My new monthly layout is a fold-out version inspired by DIYfish. I used a monthly calendar scaled down for printing from timeanddate.com. (I just need to find a sticker of some kind to cover the timeanddate logo in the top left corner Smile with tongue out)

Bilde 29.09.2016, 22.36.59

Bilde 29.09.2016, 22.37.14

Bilde 29.09.2016, 22.37.04

updated pictures of my new monthly layout

I see I haven’t posted about the change in my weekly layouts either…changed them a while back. So here is a picture of the layout I’ve been using lately…plain and simple.

Bilde 30.09.2016, 20.55.49
last week

I changed the weekly layout when I found that I just needed more space to write. As an early (or late) Christmas/birthday for myself, I bought me an Polaroid zip printer. So now I can hopefully print some pictures to my weekly layouts and have more of a memory planner touch to my planner.

You can read more about the Polaroid zip here, and buy it here (Norwegian store).

Memory planners is a concept that is fairly like scrapbooking – document your memories on a daily/weekly basis. All who know me in person know I’ve been scrapping for a while. So memory planners are just up my alley. (I haven’t scrapped for a while now….ever since SweetieL was born the day just isn’t long enough to do all I want and still get enough sleep). Heidi Swapp has some beautiful memory planners. Lots of videos about memory planners on Youtube. Like this one(by Heidi Swapp herself) or this one (by Tiffany Julia, her blog here).

- how do you document your memories?

Friday, July 8, 2016

Foam party

A while back I came over a frugal tip on how to “stretch” your favorite liquid hand soaps, on Pintrest of course. This tip to be exact. The past year it has been a very helpful tip, with kids using hand soap like it was free…

The tip is very simple. A foaming soap dispenser, hand soap and warm water. I eyeball about 2-3cm of hand soap into the bottles and fill up with warm water. Leave a couple of centimeters so the bottle doesn’t overflow when screwing on the foaming pump. Swirl or shake the mixture until the soap has dissolved completely. I have so far only used clear liquid soaps, but I have read that the creamy soaps with leave you with a cloudy soap. With a toddler in house I added a dash of Dettol for the antiseptic features. Not too much though, or your soap will have a antiseptic sting to its smell.

Bilde 08.07.2016, 18.40.30
no fancy bottles….but works for us

Well the other day the girls were playing in the shower with foam and I came to think of the above mentioned tip. Would this work with shower wash too? So I gave it a try….

Bilde 08.07.2016, 18.39.20

Let the foam party being!

- do you have any smart frugal tips to share?

Tuesday, December 29, 2015

Medallions

SweetieS has gone on hicks with her grand-parents several times. And for kids who finish the hicks, medallions are rewarded. Needless too say, SweetieS has a few…eventhough she is “only” 3 years old…

Long have I had a project in mind….and now I finally sat down and composed this post.

Earlier this year I picked up this frame at a local flea market (in Oslo these are typically hosted at elementary schools)…If you are interested in attending a flea market – and contributing to the local youth activites, you can find an updated list here

Bilde 06.09.15, 12.17.57

With a few coats of paint and some fabric I had laying around, SweetieS now has a place to put her medallions. This DIY project was inspired by this post on Pintrest.

Bilde 29.12.15, 18.03.55

I know, they aren’t hung perfectly straight..

- how do you organize your medalions?

Related Posts Plugin for WordPress, Blogger...